-1.png?height=120&name=formrun_logo%20(3)-1.png)
How to assign or remove customer labels on the customer list screen and customer detail screen. When assigning/removing customer labels on the customer list screen, you can assign/remove multiple labels to/from multiple customers at once.
- How to assign customer labels on the customer list page (possible to assign in bulk)
- How to remove customer labels on the customer list page (possible to remove in bulk)
- Advanced usage: When wanting to assign/remove customer labels to multiple customers in bulk
- Note: Points to consider when handling on the customer list page
- How to assign customer labels on the customer details page
- How to remove customer labels on the customer details page
For instructions on navigating to the customer list page, please refer to here.
For instructions on navigating to the customer details page, please refer to here.
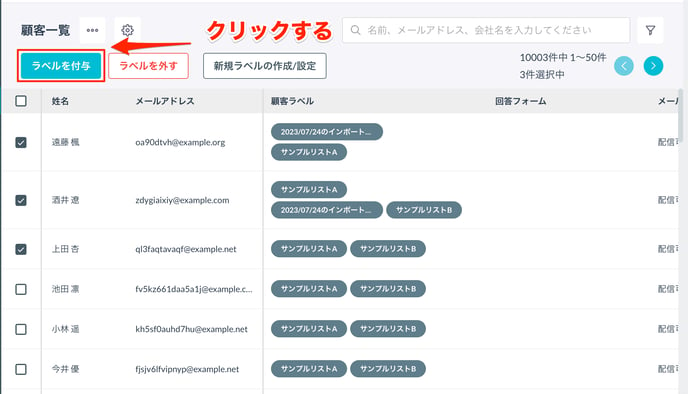
How to assign customer labels on the customer list page (possible to assign in bulk)
When assigning customer labels on the customer list page, you can assign multiple customer labels to multiple customers that match specified criteria. This is recommended when you want to save the effort of assigning them one by one.
The procedure to assign labels on the customer list page is as follows:
- Check the target customers to assign the customer label
- Click the "Assign Label" button
- Select the label to assign
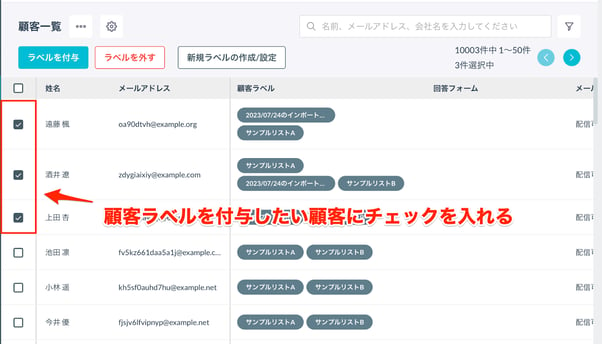
1. Check the target customers to assign the customer label
-1.png?width=688&height=394&name=%E9%A1%A7%E5%AE%A2%E3%81%AE%E9%81%B8%E6%8A%9E(%E7%B7%A8%E9%9B%86%E6%B8%88%E3%81%BF)-1.png)
Please check the checkbox on the left side of the page of the target customers you wish to assign the customer label to.
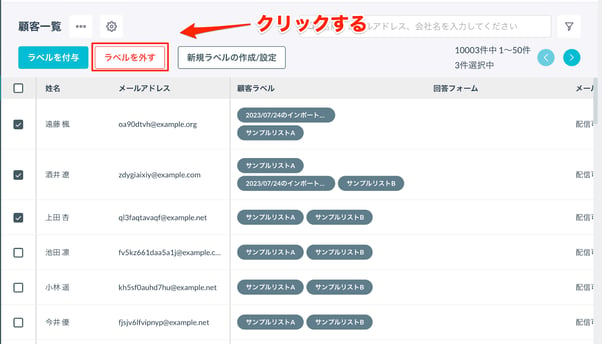
2. Click the "Assign Label" button
Please click the "Assign Label" button located at the top of the page.
3. Select the customer label to assign
-1.png?width=688&height=509&name=%E9%A1%A7%E5%AE%A2%E3%83%A9%E3%83%99%E3%83%AB%E3%81%AE%E9%81%B8%E6%8A%9E(%E7%B7%A8%E9%9B%86%E6%B8%88%E3%81%BF)-1.png)
Select the desired customer label and click the "Assign" button.
How to remove customer labels on the customer list page (possible to remove in bulk)
When removing customer labels on the customer list page, you can remove multiple customer labels from multiple customers that match specified criteria. This is recommended when you want to save the effort of removing them one by one.
The procedure to remove labels on the customer list page is as follows:
- Check the target customers to remove the customer label
- Click the "Remove Label" button
- Select the label to remove
1. Check the customers from whom you want to remove the label
Please check the checkbox on the left side of the page of the customer to whom you want to assign the label.
2. Click the "Remove Label" button
Please click the "Remove Label" button at the top of the page.
3. Select the customer label you want to remove

Select the customer label you want to remove and click the "Confirm" button. After verifying the content, please click the "Remove" button.
Advanced usage: If you want to batch assign/remove labels to multiple customers
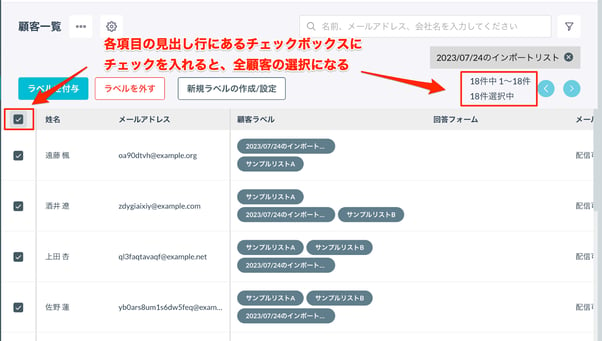
If you want to select multiple customers, check the checkbox in the header row of each field. By doing so, all customers will be selected.
By using the detailed customer search, you can filter customers to be displayed by the form, form status, form card label, and customer label. Please use it according to the situation where you want to assign a label only to the filtered customers.
For detailed customer search, please refer to this link.
Note: Points to note when dealing on the customer list page
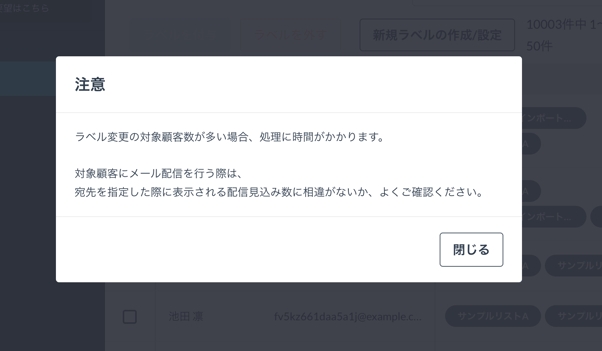
If you are assigning/removing customer labels on the customer list page and there are many target customers, it will take time to process.
If you assign a customer label and immediately use the bulk email distribution function to send emails, please make sure there is no discrepancy between the number of customer labels and the expected number of deliveries.
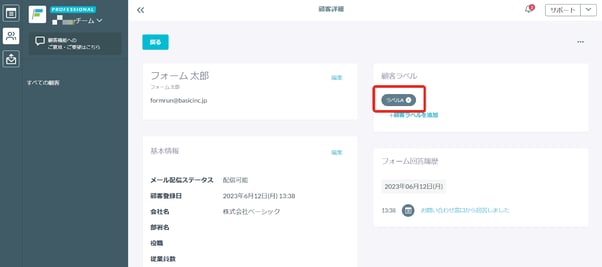
How to assign a customer label on the customer detail page
If you want to assign a label while carefully checking the customer's fields (such as name and address) and form submissions, it is recommended to assign the customer label on the customer detail page.
To assign a customer label on the customer detail page, click "Add Customer Label" from the "Customer Label" on the customer detail page.
How to remove a customer label on the customer detail page
If you want to remove it while carefully checking the customer's fields (such as name and address) and form submissions, it is recommended to do so on the customer detail page.
To remove a customer label on the customer detail page, click the "×" next to the customer label.