-1.png?height=120&name=formrun_logo%20(3)-1.png)
To create a form with a payment feature, follow these steps in order: "Set up the products," "Configure the payment methods," and "Add the product purchase (payment) field to the form."
- Orderer's Guide: Completing an order on a payment-enabled forms
- What you cannot do with payment-enabled forms
- Common questions about creating payment-enabled forms
What is a payment-enabled form?
A payment form is a form that enables payments to be processed directly within the form or calculates the payment amount and guides users to complete the payment.
This form is created by configuring products and payment methods.
When integrated with PayPal, it offers users the option to make payments using PayPal, debit cards, and credit cards directly within the form.
These forms can be used for paid event applications and registrations or for selling products.
※ Currently, we are in the trial version offering period. The timing of the official version release is undecided. The target plans and fees for the official version release will be announced approximately one month before the release. (Please be assured that there will be no automatic billing after using the function)

Steps to create a payment-enabled form
You can proceed with creating a payment-enabled form using the following steps.
If you want to set up PayPal, Debit Card, or Credit Card as your payment method, please refer to step 1.
If this is not necessary, you can skip ahead to step 3.
- Create a PayPal business account
- Link with PayPal
- Register products on the form settings page you want to use as a payment form
- Set up payment methods
- Select products in the form edit page
- Review the form

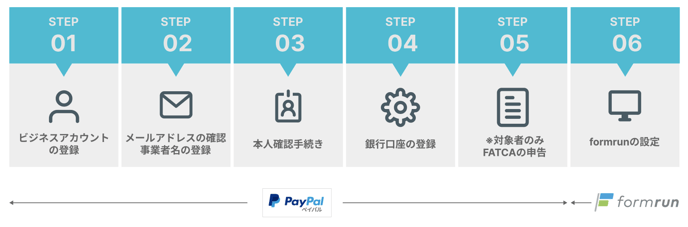
1. Create a PayPal business account
Registration of a PayPal Business Account is required.
Please note that registration for a Business Account is free.
For registration of a Business Account, please click here (redirects to an external site)
For Business Account setup instructions, please click here (redirects to an external site)
For more details on PayPal integration, please check here.
2. Link with PayPal
Go to the team settings page.
※ Members with team member permissions cannot configure this. (Team permissions here)

Go to the "Link with PayPal" page, and click the "Link" button.

For more information on PayPal linkage, please click here.
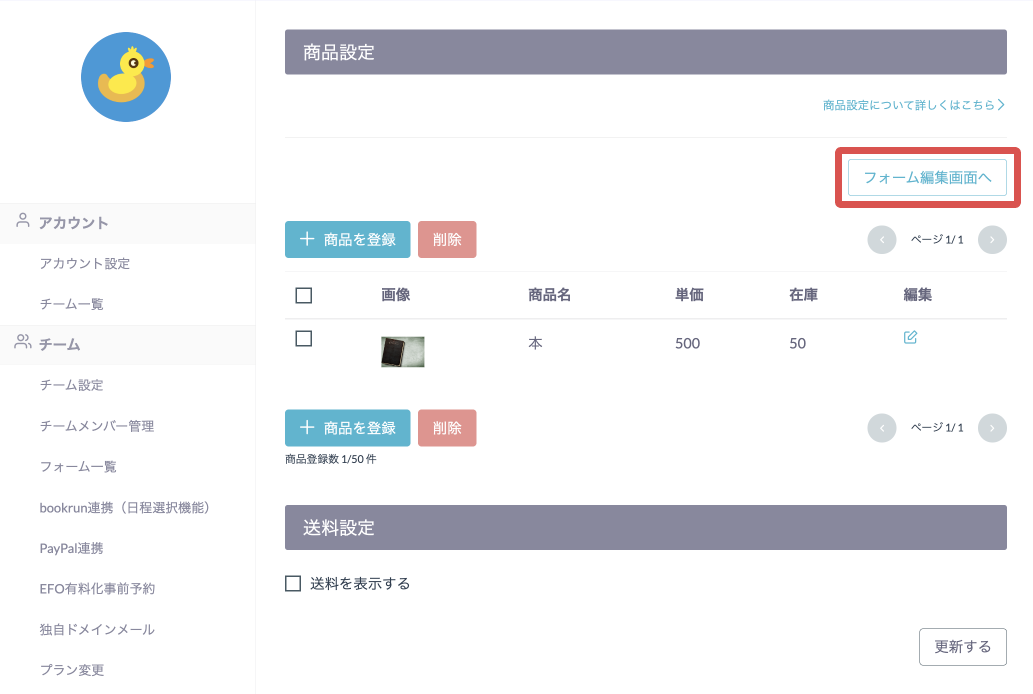
3. Register products on the form settings page you want to use as a payment form
Choose the form where you want to add products and navigate to the Form Settings page.
*Please note that these settings cannot be configured using form member permissions. (For more information on form permissions, click here.)

Go to the "Product Settings" page and enter the necessary information for the product and register it.
Please note that products must be registered for each form individually.

For more information on product registration, please click here.
4.Set up payment methods
On the "Product Settings" page, select and configure the payment methods you want to display on the form from the following options.
- PayPal / Debit or Credit Card
- Bank Transfer
- Cash on Delivery
If you want to use payment methods other than the ones listed above, you can add them by clicking the "Add payment method" button.
The selected payment method will be displayed as "Payment Method" in the "Purchase Products (Payment)" field on the form.
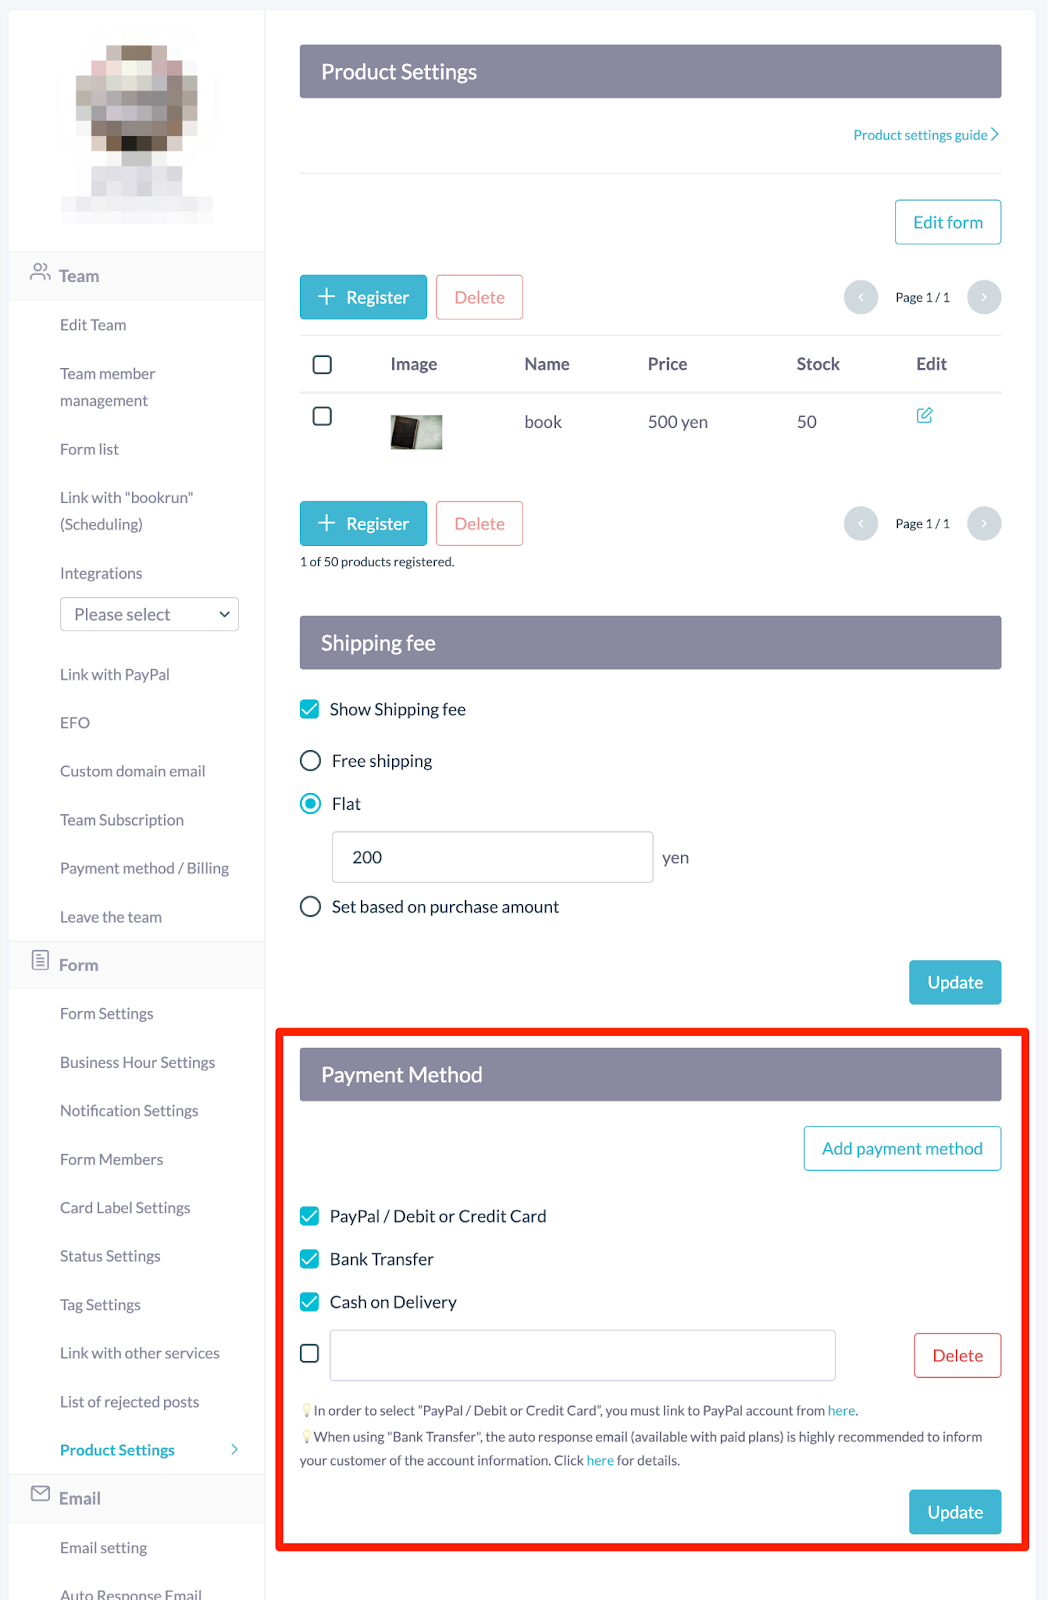
For more information on setting up payment methods, please click here.
5. Select products in the form edit page
Go to the form edit page.
On the form edit page, add the "Purchase Products (Payment)" field and select the products you want to display on the form.

For more information, please click here.
6. Review the form
After publishing the form, open the form URL and verify that the Purchase Products (Payment) field is correctly displayed.

Complete the form and press the "Confirm your entries" button.
If you select "PayPal / Debit or Credit Card," you will be redirected to the following page.
*The actual payment will be processed when you confirm the payment.

Selecting a different payment method will redirect you to the following page.

Upon completing the payment or submitting the form, you will be directed to the following thanks page.

Purchases will be notified through notifications. Please verify the new card on the board page, and ensure the product or service is ready. (For more information about cards, click here. )
You can watch a video demonstrating the process of creating a form with a payment feature below.
Orderer's Guide: Completing an order on a payment-enabled forms
To understand the process from Orderer form submission to payment completion, please consult the image below.
The Orderer can select their preferred payment method from the options set by the seller on the product setting page.
*The orderer can purchase and order products using debit or credit card payments, even without a PayPal account.

What you cannot do with payment-enabled forms
- Inventory Management System Integration:
Currently, you can set inventory for each product, but we don't offer integration with inventory management systems. You are responsible for your inventory management.
For product settings details, click here. - Bank Transfer Payment Confirmation:
While bank transfers can be set as a payment method, you are responsible for confirming and managing actual transfers. - Setting Fees for Payment Methods:
Please notify your customers of potential separate fees for each payment method, through the form, auto response or individual emails.
For payment method setup details, click here.
Common questions about creating payment-enabled forms
They are listed here. If you have any questions, please take a look.